MySQL 锁表种类

常见的有行锁和表锁。表锁会锁住整张表,并发能力弱,开发中要避免使用表级锁。行锁只将单行数据锁住,锁数据期间对其它行数据不影响,并发能力高,一般使用行锁来处理并发事务。
MySQL是如何加不同类型的锁的?对于加锁数据的筛选条件,有其对应的索引建立,MySQL可以快速定位的数据进行行级加锁;而对于没有索引的情况,MySQL 的做法是会先锁住整张表,然后再去获取数据,然后将不满足条件的数据锁释放掉。

等待锁超时问题

Lock wait timeout exceeded; try restarting transaction
一种情况是因为有操作语句对整个表加锁了,这里发现的例子是在开启事务做 UPDATE 更新时发现的,UPDATE 条件如果不是主键或者没有索引则会锁整张表,只有以主键为条件或完全匹配的唯一索引做更新才是行级锁。
还有就是另一个事务中持有锁时间过长导致。

SELECT * FROM INNODB_TRX;  // 查看事务表锁状态

// 创建事务,更新语句,但是不提交
SET SESSION AUTOCOMMIT=off;
BEGIN;
UPDATE tabl1 SET status=1 WHERE expired_at <123456 AND expired_at >= 12346 AND `status` = 0;

这时候再去提交则会报等待锁超时问题。

http://www.toniz.net/?p=556

加行锁的注意事项:

http://blog.csdn.net/u014453898/article/details/56068841

插入语句死锁问题

在 INSERT 语句中出现 Deadlock found when trying to get lock; try restarting transaction 是因为范围匹配加锁是对索引页加锁了,导致其它事务插入数据时报死锁。处理办法是查询改成行锁,以 ID 或唯一索引加锁。

这里需要强调的是尽量避免使用范围加锁。最好是通过主键加行锁处理。

避免加锁失败和发生死锁的注意事项

  1. 减少锁占用时间,避免拿锁时做过多耗时操作。
  2. 加锁条件需对应加索引,尽量为行级锁。
  3. 避免死锁需要再开启事务后一次将所需资源加锁,处理后及时 COMMIT 释放锁。
  4. 对于请求的网络资源,首先将所需外部资源准备好。
  • 对于开启事物后加锁,只有 COMMIT 后方可释放锁
  • 在捕获异常中的处理,在捕获异常后要记得 ROLLBACK
  • 等待锁超时时间一般设置在 1-2 秒时间 SET innodb_lock_wait_timeout=1

安装

pip install virtualenv

创建虚拟环境

1
2
3
4
root@kali:/recall/code# virtualenv test_env
New python executable in test_env/bin/python
Installing setuptools, pip...done.
root@kali:/recall/code#

默认情况下,虚拟环境会依赖系统环境中的site packages,就是说系统中已经安装好的第三方package也会安装在虚拟环境中,
如果不想依赖这些package,那么可以加上参数

–no-site-packages 

1
2
3
4
root@kali:/recall/code# virtualenv test_env --no-site-packages 
New python executable in test_env/bin/python
Installing setuptools, pip...done.
root@kali:/recall/code#

或者进入到项目目录:virtualenv .,如果需要指定 Python3 则 virtualenv -p python .

启动虚拟环境

我们先进入到该目录下:cd test_env/

1
source bin/activate

启动成功后,会在前面多出 test_env 字样,如下所示

1
(test_env)root@kali:/recall/code/test_env#

退出虚拟环境

1
deactivate

今天测试了一把,感觉还不错。

  1. 拖入图片即所见。
  2. 可以边写边展示。
  3. 再配合字写的Python处理脚本可以一行命令自动保存发布。

1505966065271

此博客记录为备份命令:

Node 安装配置

不要使用 apt-get 带的版本,太旧,自己去官网下载安装,方法如下:

下载并解压 node-v6.9.5-linux-x64.tar.xz

tar -xJf node-v6.9.5-linux-x64.tar.xz

移到通用的软件安装目录 /opt/

sudo mv node-v6.9.5-linux-x64 /opt/

安装 npm 和 node 命令到系统命令

sudo ln -s /opt/node-v6.9.5-linux-x64/bin/node /usr/local/bin/node

sudo ln -s /opt/node-v6.9.5-linux-x64/bin/npm /usr/local/bin/npm

验证:

node -v

ipython notebook 远程访问

创建配置

ipython profile create common

生成访问密码

1
2
3
4
5
In [1]: from notebook.auth import passwd
In [2]: passwd()
Enter password:
Verify password:
Out[2]: 'sha1:ce23d945972f:34769685a7ccd3d08c84a18c63968a41f1140274'

生成证书
openssl req -x509 -nodes -days 365 -newkey rsa:1024 -keyout common.pem -out common.pem

在profile目录下, 编辑ipython_notebook_config.py

1
2
3
4
5
6
7
~/.ipython/profile_common/ipython_notebook_config.py
c = get_config()
c.NotebookApp.certfile=u'/home/xyz/.ipython/profile_common/common.pem'
c.NotebookApp.ip='*'
c.NotebookApp.open_browser=False
c.NotebookApp.password=u'sha1:c5f8fbcb1f9a:bfa8a1879fc2f6bd932a1a4089cbc9775cdcd98e'
c.NotebookApp.port=1234

启动命令

ipython notebook --config=/home/xyz/.ipython/profile_common/ipython_notebook_config.py

修改目录权限

sudo chmod -R 775 .

Tensorflow GPU 运行环境安装

显卡驱动

1
2
3
sudo add-apt-repository ppa:graphics-drivers/ppa
sudo apt-get update
sudo apt-get install nvidia-384

CUDA 驱动安装

sudo ./cuda_8.0.61_375.26_linux.run

其中第一个显卡驱动选项不要再安装了

CUDNN 安装

1
2
3
4
tar -xzvf cudnn-8.0-linux-x64-v6.0.tgz
cd cudnn-8.0-linux-x64-v6.0/
sudo cp lib* /usr/local/cuda/lib64/
sudo cp cudnn.h /usr/local/cuda/include/

添加环境变量

1
2
3
export PATH=/usr/local/cuda-8.0/bin:$PATH
export PATH=/usr/local/cuda-8.0/lib64:$PATH
export LD_LIBRARY_PATH=/usr/local/cuda-8.0/lib64:$LD_LIBRARY_PATH

查看 NVIDIA 显卡状态

watch -n 1 -d nvidia-smi

练习代码

1
2
3
4
5
6
7
8
9
10
11
12
13
14
15
16
17
18
19
20
21
22
23
24
25
26
27
28
29
30
31
32
33
34
35
36
37
38
39
40
41
42
# -*- coding:utf-8 -*-
import tensorflow as tf
from tensorflow.examples.tutorials.mnist import input_data
import matplotlib.pyplot as plt
import matplotlib.gridspec as gridspec

# 下载或加载数据
mnist = input_data.read_data_sets("MNIST_data", one_hot=True)


def weight_variable(shape):
inital = tf.truncated_normal(shape, stddev=0.1)
return tf.Variable(inital)


def bias_variable(shape):
inital = tf.constant(0.1, shape=shape)
return tf.Variable(inital)


def conv2d(x, w):
return tf.nn.conv2d(x, w, strides=[1, 1, 1, 1], padding='SAME')


def max_pool_2x2(x):
return tf.nn.max_pool(x, ksize=[1, 2, 2, 1], strides=[1, 2, 2, 1], padding='SAME')


xs = tf.placeholder(tf.float32, [None, 784]) # 28 * 28
ys = tf.placeholder(tf.float32, [None, 10])
x_image = tf.reshape(xs, [-1, 28, 28, 1])
# conv1 layer #
w_conv1 = weight_variable([5, 5, 1, 32]) # patch 5 x 5, in size 1, out size 32
b_conv1 = bias_variable([32])
h_conv1 = tf.nn.relu(conv2d(x_image, w_conv1) + b_conv1) # output size 28 x 28 x 32
h_pool1 = max_pool_2x2(h_conv1) # output size 14 x 14 x 32

# conv2 layer #
w_conv2 = weight_variable([5, 5, 32, 64]) # patch 5 x 5, in size 32, out size 64
b_conv2 = bias_variable([64])
h_conv2 = tf.nn.relu(conv2d(h_pool1, w_conv2) + b_conv2) # output size 14 x 14 x 64
h_pool2 = max_pool_2x2(h_conv2) # output size 7 x 7 x 64
Extracting MNIST_data/train-images-idx3-ubyte.gz
Extracting MNIST_data/train-labels-idx1-ubyte.gz
Extracting MNIST_data/t10k-images-idx3-ubyte.gz
Extracting MNIST_data/t10k-labels-idx1-ubyte.gz

输出结果

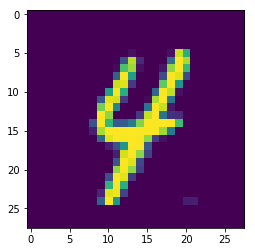
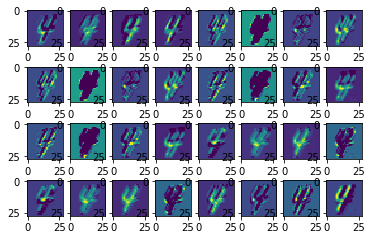
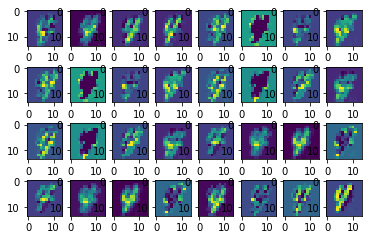
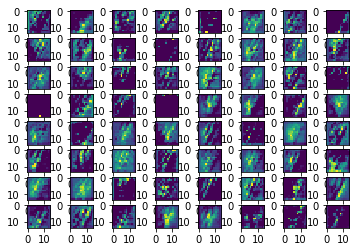
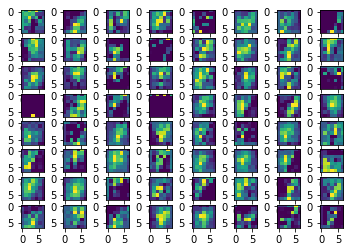
两层卷基层和两层池化层的处理结果展示出提取出的图像特征

1
2
3
4
5
6
7
8
9
10
11
12
13
14
15
16
17
18
19
20
21
22
23
24
25
26
27
28
29
30
31
32
33
34
35
36
37
38
39
40
41
42
43
44
45
46
47
48
49
50
with tf.Session() as sess:
sess.run(tf.global_variables_initializer())
batch_xs, batch_ys = mnist.train.next_batch(1)

h_conv1_res, h_pool1_res, h_conv2_res, h_pool2_res = \
sess.run([h_conv1, h_pool1, h_conv2, h_pool2],
feed_dict={xs: batch_xs, ys: batch_ys})

input_x = batch_xs.reshape([28, 28])
print "Show input:"
print "input shape:", input_x.shape
gs1 = gridspec.GridSpec(1, 1)
plt.imshow(input_x)
plt.show()

print "Show first conv2d result:"
print "conv2d shape:", h_conv1_res.shape
gs1 = gridspec.GridSpec(4, 8)
for x in range(4):
for y in range(8):
plt.subplot(gs1[x, y])
plt.imshow(h_conv1_res[0, :, :, x * 4 + y])
plt.show()

print "Show first max_pool result:"
print "max_pool shape:", h_pool1_res.shape
gs1 = gridspec.GridSpec(4, 8)
for x in range(4):
for y in range(8):
plt.subplot(gs1[x, y])
plt.imshow(h_pool1_res[0, :, :, x * 4 + y])
plt.show()

print "Show second conv2d result:"
print "conv2 shape:", h_conv2_res.shape
gs1 = gridspec.GridSpec(8, 8)
for x in range(8):
for y in range(8):
plt.subplot(gs1[x, y])
plt.imshow(h_conv2_res[0, :, :, x * 8 + y])
plt.show()

print "Show second max_pool result:"
print "max_pool shape:", h_pool2_res.shape
gs1 = gridspec.GridSpec(8, 8)
for x in range(8):
for y in range(8):
plt.subplot(gs1[x, y])
plt.imshow(h_pool2_res[0, :, :, x * 8 + y])
plt.show()
Show input:
input shape: (28, 28)

png

Show first conv2d result:
conv2d shape: (1, 28, 28, 32)

png

Show first max_pool result:
max_pool shape: (1, 14, 14, 32)

png

Show second conv2d result:
conv2 shape: (1, 14, 14, 64)

png

Show second max_pool result:
max_pool shape: (1, 7, 7, 64)

png

卷基层和池化层的处理

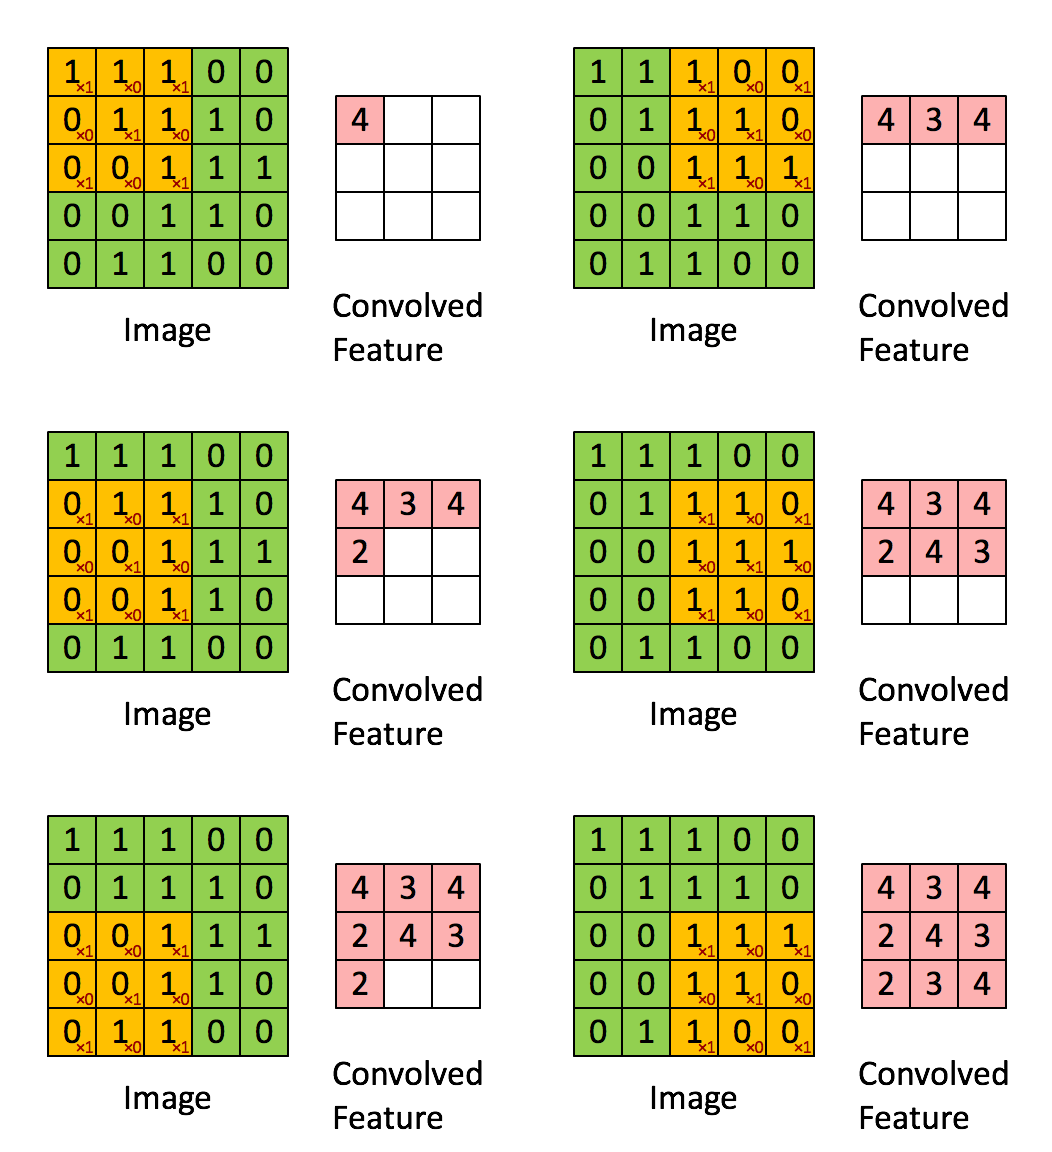
卷积层部分被称之为过滤器(或者内核)

单位节点矩阵指长和宽都为1,深度不限的节点矩阵。

过滤器处理的矩阵深度和当前层神经网络节点矩阵的深度一致。

过滤器的处理方式如下图:

convolution_schematic

卷基层的参数个数 = 过滤器尺寸 × 输入矩阵深度 × 卷基层深度 + 卷基层深度(偏置个数)

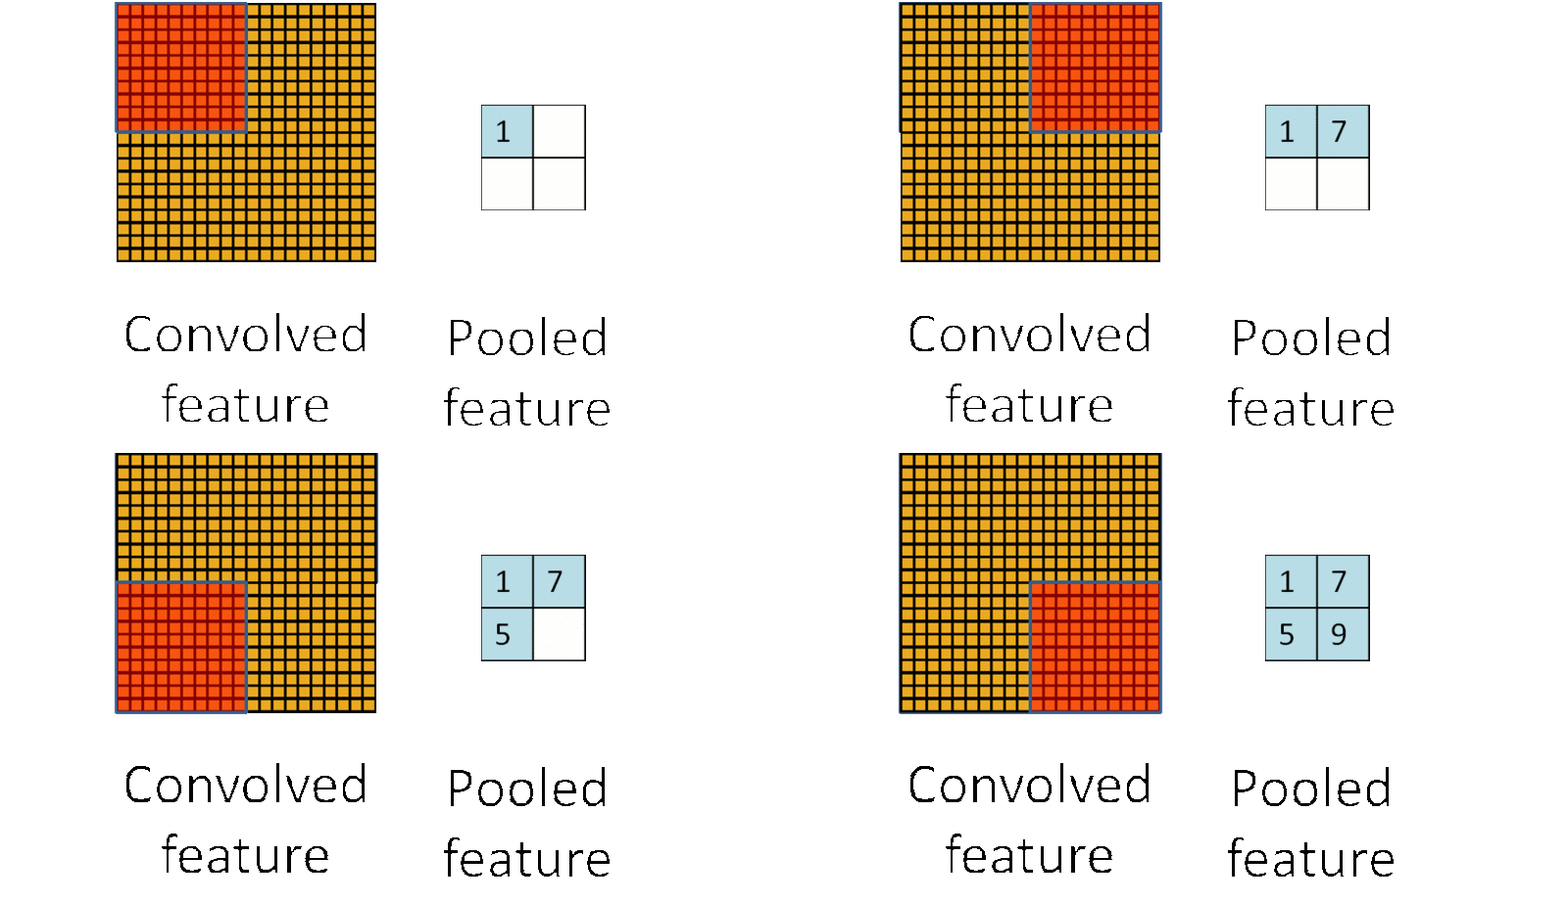
池化层处理可以非常有效的缩小矩阵的尺寸,同时可以防止过拟合的问题。池化层的计算通常有两种方式,一种是最大池化层,另一种是取平均值的平均池化层。

池化层处理方式:

pooling_schematic

其它工具用法总结

matplotlib 图像行内显示: %matplotlib inline

通过 PIL 加载图像:Image.open('img/cnn_sample_test.jpg')

图像转 numpy array: numpy.asarray(img, dtype='float32')

numpy array 转 PIL 图像: Image.fromarray(img[:, :, :], 'RGB')

第一个参数是 array ,第二个参数是图像的模式,灰度图像为 L,彩色图像为 RGB, 灰度图像深度为1,是一个二维矩阵,RGB图像为三层深度的二维矩阵。

PIL 多图像拼接显示:

1
2
3
4
5
6
7
8
gs1 = gridspec.GridSpec(3, 5)
for i in range(3):
plt.subplot(gs1[i, 0]); plt.axis('off'); plt.imshow(img[:, :, :])
plt.subplot(gs1[i, 1]); plt.axis('off'); plt.imshow(conv_op[0, :, :, i])
plt.subplot(gs1[i, 2]); plt.axis('off'); plt.imshow(sigmoid_op[0, :, :, i])
plt.subplot(gs1[i, 3]); plt.axis('off'); plt.imshow(avg_pool_op[0, :, :, i])
plt.subplot(gs1[i, 4]); plt.axis('off'); plt.imshow(max_pool_op[0, :, :, i])
plt.show()

gridspec.GridSpec(3, 5) 可以理解为将一个画布分成 3 × 5 的方格

plt.subplot(gs1[0, 0]); plt.axis('off'); plt.imshow(img[:, :]) 选择第一个画布,将图像填充到这个画布下,并且不显示坐标。

参考资料:

http://mourafiq.com/2016/08/10/playing-with-convolutions-in-tensorflow.html

卷积神经网络 - 维基百科

这篇例子是学习 莫烦PYTHON 视频教程整理的学习笔记。

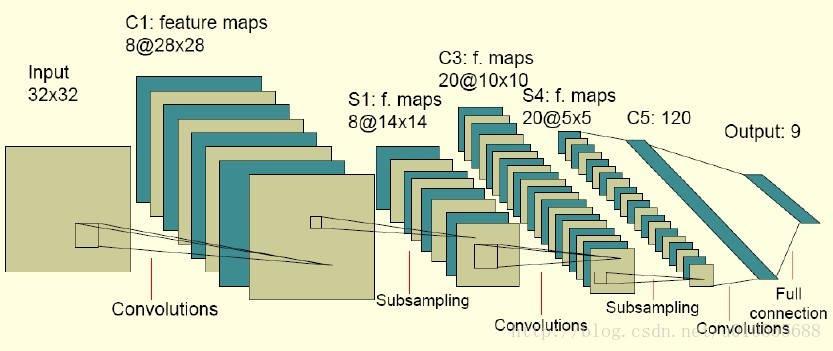
卷积神经网络包含如下几层:

  1. 输入层
  2. 卷积层(卷积层的结构 + 向前传播算法) =>> (过滤器或内核)(用来提取特征,每一层会将图层变厚)
  3. 池化层(用来采样,稀疏参数,每一层会将图层变瘦)
  4. 全连接层(将前两层提取的图像特征使用全连接层完成分类任务)
  5. Softmax 层(主要处理分类,得到不同种类的概率分布情况)

cnn

首先我们将如下包导入,这次练习是通过 Tensorflow 提供的 MNIST 数据集进行训练,识别手写数字。

1
2
3
4
5
6
import tensorflow as tf
import numpy as np
from tensorflow.examples.tutorials.mnist import input_data

# 下载或加载数据
mnist = input_data.read_data_sets("MNIST_data", one_hot=True)
Extracting MNIST_data/train-images-idx3-ubyte.gz
Extracting MNIST_data/train-labels-idx1-ubyte.gz
Extracting MNIST_data/t10k-images-idx3-ubyte.gz
Extracting MNIST_data/t10k-labels-idx1-ubyte.gz
1
2
3
4
5
6
7
8
9
10
11
12
13
14
15
16
17
18
19
20
21
22
23
24
25
26
27
28
29
30
31
32
33
34
35
36
37
38
39
40
41
42
43
44
45
46
47
48
49
50
51
52
53
54
55
56
57
58
59
60
61
62
63
64
65
66
67
def weight_variable(shape):
inital = tf.truncated_normal(shape, stddev=0.1)
return tf.Variable(inital)


def bias_variable(shape):
inital = tf.constant(0.1, shape=shape)
return tf.Variable(inital)

def add_layer(inputs, in_size, out_size, activation_function=None):
# 在生成初始参数时,随机变量(normal distribution)会比全部为0要好很多
# 所以我们这里的weights为一个in_size行, out_size列的随机变量矩阵。
weights = tf.Variable(tf.random_normal([in_size, out_size]))
# biases的推荐值不为0,所以我们这里是在0向量的基础上又加了0.1
biases = tf.Variable(tf.zeros([1, out_size]) + 0.1)
wx_plus_b = tf.matmul(inputs, weights) + biases
if activation_function is None:
outputs = wx_plus_b
else:
outputs = activation_function(wx_plus_b)
return outputs

def compute_accuracy(v_xs, v_ys):
global prediction
y_pre = sess.run(prediction, feed_dict={xs: v_xs, keep_drop: 1})
correct_prediction = tf.equal(tf.argmax(y_pre,1), tf.argmax(v_ys,1))
accuracy = tf.reduce_mean(tf.cast(correct_prediction, tf.float32))
result = sess.run(accuracy, feed_dict={xs: v_xs, ys: v_ys, keep_drop: 1})
return result

def conv2d(x, w):
# stride [1, x_movement, y_movement, 1]
# Must have strides[0] = strides[4] = 1
return tf.nn.conv2d(x, w, strides=[1,1,1,1], padding='SAME')

def max_pool_2x2(x):
# stride [1, x_movement, y_movement, 1]
return tf.nn.max_pool(x, ksize=[1,2,2,1], strides=[1,2,2,1], padding='SAME')

xs = tf.placeholder(tf.float32, [None, 784]) # 28 * 28
ys = tf.placeholder(tf.float32, [None, 10])
keep_drop = tf.placeholder(tf.float32)
x_image = tf.reshape(xs, [-1, 28, 28, 1])
# print x_image.shape # [n_sample, 28, 28, 1]

# conv1 layer #
w_conv1 = weight_variable([5,5,1,32]) # patch 5 x 5, in size 1, out size 32
b_conv1 = bias_variable([32])
h_conv1 = tf.nn.relu(conv2d(x_image, w_conv1) + b_conv1) # output size 28 x 28 x 32
h_pool1 = max_pool_2x2(h_conv1) # output size 14 x 14 x 32

# conv2 layer #
w_conv2 = weight_variable([5,5,32,64]) # patch 5 x 5, in size 32, out size 64
b_conv2 = bias_variable([64])
h_conv2 = tf.nn.relu(conv2d(h_pool1, w_conv2) + b_conv2) # output size 14 x 14 x 64
h_pool2 = max_pool_2x2(h_conv2) # output size 7 x 7 x 64

# func1 layer #
w_fc1 = weight_variable([7 * 7 * 64, 1024])
b_fc1 = bias_variable([1024])
h_pool2_flat = tf.reshape(h_pool2, [-1, 7*7*64]) # [n_sample, 7, 7 64] -> [n_sample, 7*7*64]
h_fc1 = tf.nn.relu(tf.matmul(h_pool2_flat, w_fc1) + b_fc1)
h_fc1_drop = tf.nn.dropout(h_fc1, keep_drop)

# func2 layer #
w_fc2 = weight_variable([1024, 10])
b_fc2 = bias_variable([10])

通过使用 softmax 分类器输出分类

1
prediction = tf.nn.softmax(tf.matmul(h_fc1_drop, w_fc2) + b_fc2)

loss函数(即最优化目标函数)选用交叉熵函数。交叉熵用来衡量预测值和真实值的相似程度,如果完全相同,它们的交叉熵等于零。

1
cross_entropy = tf.reduce_mean(-tf.reduce_sum(ys * tf.log(prediction), reduction_indices=[1]))

通过使用 AdamOptimizer 优化器进行优化,使 cross_entropy 最小

1
train_step = tf.train.AdamOptimizer(1e-4).minimize(cross_entropy)

下面开始训练,通过两千次的训练,每次抽样 100 条数据,每 100 次训练完验证一下预测的准确率

1
2
3
4
5
6
7
8
9
10
11
with tf.Session() as sess:
sess.run(tf.global_variables_initializer())

for i in range(1, 2001):
batch_xs, batch_ys = mnist.train.next_batch(100)
sess.run(train_step, feed_dict={xs: batch_xs, ys: batch_ys, keep_drop: 0.5})
if i % 100 == 0:
print i, compute_accuracy(
mnist.test.images[:1000], mnist.test.labels[:1000])

print "end!"

训练结果:

100 0.861
200 0.904
300 0.93
400 0.933
500 0.94
600 0.949
700 0.955
800 0.958
900 0.961
1000 0.964
1100 0.966
1200 0.968
1300 0.972
1400 0.968
1500 0.973
1600 0.972
1700 0.976
1800 0.975
1900 0.973
2000 0.981
end!

[以下代码基于 Tornado 3.2.1 版本讲解]
[主要目标:讲解 gen.coroutine、Future、Runner 之间的关系]

这里是示例运行代码

1
2
3
4
5
6
7
8
9
10
11
12
13
14
15
16
17
18
19
20
21
22
23
24
25
26
27
28
29
30
31
32
33
34
35
36
37
38
39
40
41
42
43
44
#!/usr/bin/python
# coding: utf-8
"""
File: demo.py
Author: noogel
Date: 2017-08-28 22:59
Description: demo
"""
import tornado

from tornado import gen, web


@gen.coroutine
def service_method():
raise gen.Return("abc")


class NoBlockHandler(tornado.web.RequestHandler):

@web.asynchronous
@gen.coroutine
def get(self):
result = yield service_method()
self.write(result)
self.finish()


class Application(tornado.web.Application):

def __init__(self):
settings = {
"xsrf_cookies": False,
}
handlers = [
(r"/api/noblock", NoBlockHandler),
]
tornado.web.Application.__init__(self, handlers, **settings)


if __name__ == "__main__":
Application().listen(2345)
tornado.ioloop.IOLoop.instance().start()

演示运行效果…

讲解从 coroutine 修饰器入手,这个函数实现了简单的异步,它通过 generator 中的 yield 语句使函数暂停执行,将中间结果临时保存,然后再通过 send() 函数将上一次的结果送入函数恢复函数执行。

1
2
3
4
5
6
7
8
9
10
11
12
13
14
15
16
17
18
19
20
21
22
23
24
25
26
27
28
29
30
31
def coroutine(func):
@functools.wraps(func)
def wrapper(*args, **kwargs):
future = TracebackFuture()
if 'callback' in kwargs:
print("gen.coroutine callback:{}".format(kwargs['callback']))
callback = kwargs.pop('callback')
IOLoop.current().add_future(
future, lambda future: callback(future.result()))
try:
print("gen.coroutine run func:{}".format(func))
result = func(*args, **kwargs)
except (Return, StopIteration) as e:
result = getattr(e, 'value', None)
except Exception:
future.set_exc_info(sys.exc_info())
return future
else:
if isinstance(result, types.GeneratorType):
def final_callback(value):
deactivate()
print("gen.coroutine final set_result:{}".format(value))
future.set_result(value)
print("gen.coroutine will Runner.run() result:{}".format(result))
runner = Runner(result, final_callback)
runner.run()
return future
print("@@ gen.coroutine will set_result and return:{}".format(result))
future.set_result(result)
return future
return wrapper
1
2
3
4
5
6
7
8
9
10
11
12
13
14
15
16
st=>start: create future object
rf=>operation: run function
ex=>condition: is not exception
gen=>condition: is generator
run=>operation: Runner.run()
fts=>operation: future.set_done()
rtnf=>operation: return future
ed=>end

st->rf->ex
ex(no)->rtnf
ex(yes)->gen
gen(yes)->run
gen(no)->rtnf
run->rtnf
rtnf->ed

首先创建一个Future实例,然后执行被修饰的函数,一般函数返回的是一个生成器对象,接下来交由 Runner 处理,如果函数返回的是 Return, StopIteration 那么表示函数执行完成将结果放入 future 中并 set_done() 返回。

下面是Future的简版:

1
2
3
4
5
6
7
8
9
10
11
12
13
14
15
16
17
18
19
20
21
22
23
24
25
26
27
28
29
30
31
32
33
class Future(object):

def __init__(self):
self._result = None
self._callbacks = []

def result(self, timeout=None):
self._clear_tb_log()
if self._result is not None:
return self._result
if self._exc_info is not None:
raise_exc_info(self._exc_info)
self._check_done()
return self._result

def add_done_callback(self, fn):
if self._done:
fn(self)
else:
self._callbacks.append(fn)

def set_result(self, result):
self._result = result
self._set_done()

def _set_done(self):
self._done = True
for cb in self._callbacks:
try:
cb(self)
except Exception:
app_log.exception('Exception in callback %r for %r', cb, self)
self._callbacks = None

在tornado中大多数的异步操作返回一个Future对象,这里指的是 Runner 中处理的异步返回结果。我们可以将该对象抽象成一个占位对象,它包含很多属性和函数。一个 Future 对象一般对应这一个异步操作。当这个对象的异步操作完成后会通过 set_done() 函数去处理 _callbacks 中的回调函数,这个回调函数是在我们在做修饰定义的时候传入 coroutine 中的。

下面的代码是在 coroutine 中定义的,用来添加对异步操作完成后的回调处理。

1
2
3
4
5
if 'callback' in kwargs:
print("gen.coroutine callback:{}".format(kwargs['callback']))
callback = kwargs.pop('callback')
IOLoop.current().add_future(
future, lambda future: callback(future.result()))

这里是 IOLoop 中的 add_future 函数,它是来给 future 对象添加回调函数的。

1
2
3
4
5
def add_future(self, future, callback):
assert isinstance(future, Future)
callback = stack_context.wrap(callback)
future.add_done_callback(
lambda future: self.add_callback(callback, future))

然后说 Runner 都做了什么。在 3.2.1 版本中 Runner 的作用更重要一些。那么 Runner() 的作用是什么?
它主要用来控制生成器的执行与终止,将异步操作的结果 send() 至生成器暂停的地方恢复执行。在生成器嵌套的时候,当 A 中 yield B 的时候,先终止 A 的执行去执行 B,然后当 B 执行结束后将结果 send 至 A 终止的地方继续执行 A。

1
2
3
4
5
6
7
8
9
10
11
12
13
14
15
16
17
18
19
20
21
22
23
24
25
26
27
28
29
30
31
32
33
34
35
36
37
38
39
40
41
42
43
44
45
46
47
48
49
50
51
52
53
54
55
56
57
58
59
class Runner(object):
def __init__(self, gen, final_callback):
self.gen = gen
self.final_callback = final_callback
self.yield_point = _null_yield_point
self.results = {}
self.running = False
self.finished = False

def is_ready(self, key):
if key not in self.pending_callbacks:
raise UnknownKeyError("key %r is not pending" % (key,))
return key in self.results

def set_result(self, key, result):
self.results[key] = result
self.run()

def pop_result(self, key):
self.pending_callbacks.remove(key)
return self.results.pop(key)

def run(self):
try:
self.running = True
while True:
next = self.yield_point.get_result()
self.yield_point = None
try:
print("gen.Runner.run() will send(next)")
yielded = self.gen.send(next)
print("gen.Runner.run() send(next) done.")
except (StopIteration, Return) as e:
print("gen.Runner.run() send(next) throw StopIteration or Return done.")
self.finished = True
self.yield_point = _null_yield_point
self.final_callback(getattr(e, 'value', None))
self.final_callback = None
return
if isinstance(yielded, (list, dict)):
yielded = Multi(yielded)
elif isinstance(yielded, Future):
yielded = YieldFuture(yielded)
self.yield_point = yielded
self.yield_point.start(self)
finally:
self.running = False

def result_callback(self, key):
def inner(*args, **kwargs):
if kwargs or len(args) > 1:
result = Arguments(args, kwargs)
elif args:
result = args[0]
else:
result = None
self.set_result(key, result)
return wrap(inner)

实例化 Runner() 的时候将生成器对象和生成器执行结束时的回调函数传入,然后通过 run() 函数去继续执行生成器对象。

run() 函数的处理首先包了一层 while 循环,因为在生成器对象中可能包含多个 yield 语句。

yielded = self.gen.send(next),在第一次 send() 恢复执行的时候默认传入 None ,因为函数第一次执行并没有结果。然后将第二次执行的结果 yielded (返回的是一个 Future 对象),包装成一个 YieldFuture 对象,然后通过 start() 函数处理:

1
2
3
4
5
6
7
8
def start(self, runner):
if not self.future.done():
self.runner = runner
self.key = object()
self.io_loop.add_future(self.future, runner.result_callback(self.key))
else:
self.runner = None
self.result = self.future.result()

首先判断 future 是否被 set_done(),如果没有则注册一系列回调函数,如果完成则保存结果,以供下一次恢复执行时将结果送入生成器。
在 Runner.run() 执行完成后此时的 coroutine 中的 future 对象已经是被 set_done 的,然后直接返回 future 对象,最后被 外层的 @web.asynchronous 修饰器消费。


参考:

http://www.cnblogs.com/MnCu8261/p/6560502.html
https://www.cnblogs.com/chenchao1990/p/5406245.html
http://blog.csdn.net/u010168160/article/details/53019039
https://www.cnblogs.com/yezuhui/p/6863781.html
http://blog.csdn.net/zhaohongyan6/article/details/70888221
https://www.zybuluo.com/noogel/note/952488

这篇文章主要介绍Mac下常用的效率工具,也许正是你所需要的或者使用后对你的工作有很大的效率提升,废话不多说,看下面介绍的五款常用效率工具。

Alfred

 
Alfred

Alfred 作为神器的霸主地位可谓实至名归,它不仅可以帮我们快速打开切换应用、打开网址,使用计算器、词典、剪贴板增强等功能,还可以通过Workflow模块实现功能的扩展,下面详细介绍一下此神器的一些功能。

首先我们定义调出 Alfred 的快捷键,这里我设置的是 Command + Space ,可以启动输入框。

Alfred

在输入框中我们可以输入想要打开或切换的应用:

Alfred

也可以输入基本的数学公式,计算结果:

Alfred

或者去 Google 搜索:

Alfred

打开 Terminal 执行命令:

Alfred

在 Web Search 中配置自定义打开的网址:

Alfred

调出剪贴板历史,我设置的快捷键是 Option + Command + C:

Alfred

默认回车会执行第一个结果,或打开网址,或将结果复制到剪贴板,这样可以极大地提高我们操作的效率。
 
当然这些默认的功能是不能够满足我们的,还可以通过 Worklow 去扩展效率工具,这里是自己做的一个效率工具箱 xyzUtils :

Alfred

Github 地址: https://github.com/noogel/Alfred-Workflow

这里我做了一些开发中常用的数据转换功能,时间戳与时间的互相转换、Unicode码中文转换、随机字符串生成、IP查询、base64编码解码、MD5生成等,回车复制结果到剪贴板,举例如下:

Alfred

网友们还提供了更多的 自定义功能,可自行知乎。

Jietu

Jietu

这个是腾讯提供的免费截图工具,可进行区域截图或者屏幕录制功能,可以快捷编辑截图,也是我常用的一个神器。配置信息如下图:

Jietu

截好图后可以按 空格键 进行快速编辑,很是方便,截图后会自动放到剪贴板,可直接粘贴到微信、QQ、Slack等应用的对话框中。

Jietu


Hammerspoon

Hammerspoon

这款神器和上面的 Alfred 功能点有些重合,可以提供快速启动应用、调整窗口大小等功能。通过自定义 Lua 脚本实现所需的功能,这些功能主要通过绑定快捷键实现功能出发,当然也会绑定一些系统事件触发脚本功能。

目前在网上搜集了一些基本功能,调整窗口比例,连接到办公区网络自动静音等功能。

Hammerspoon


Time Out

Time Out

这款工具主要是可以帮助久用电脑的人每隔一段时间暂停一下,我这里设置的每隔 50分钟暂停 3分钟,就是在这 3分钟时间这个软件会弹出屏保提醒你稍事休息一下再工作,当然暂停期间是可以随之取消的,暂停的时候就是这个样子的。

Time Out

Reeder

这是一款 Mac 上知名度很高的 RSS 阅读器,简洁的外观与便捷的操作方式可以省去了去个站点看文章。结合Mac 触控板的左右滑动操作还是很方便的。

Reeder

Reeder

最后,来还有一些常用效率工具会在在后面的文章继续介绍,或许正是你所需要的,敬请期待!

这一节将上一节学到的深度神经网络的概念运用起来,通过 tf 来实现 MNIST 手写字识别。
首先导入 tf 库和训练数据:

1
2
3
4
import tensorflow as tf
from tensorflow.examples.tutorials.mnist import input_data

mnist = input_data.read_data_sets("MNIST_data", one_hot=True)

定义全局初始常量,其中 INPUT_NODE 数为每一张图片 28 * 28 的像素数,OUTPUT_NODE 就是分类的个数 10; LAYER1_NODE 为隐藏层节点数,BATCH_SIZE 为每次训练数据的个数;LEARNING_RATE_BASE 为基础学习率,LEARNING_RATE_DECAY 为学习率的衰减率,REGULARIZATION_RATE 为正则化损失函数的系数,TRAINING_STEPS 为训练的次数,MOVING_AVERAGE_DECAY 为滑动平均衰减率。

1
2
3
4
5
6
7
8
9
10
11
INPUT_NODE = 784
OUTPUT_NODE = 10

LAYER1_NODE = 500
BATCH_SIZE = 100

LEARNING_RATE_BASE = 0.8
LEARNING_RATE_DECAY = 0.99
REGULARIZATION_RATE = 0.0001
TRAINING_STEPS = 30000
MOVING_AVERAGE_DECAY = 0.99

定义一个 inference 函数用来计算神经网络的向前传播结果,并且通过 RELU 函数实现了去线性化。avg_class 参数是用来支持测试时使用滑动平均模型,当我们使用了滑动平均模型时,weights 和 biases 值都是从 avg_class 中取出的。

1
2
3
4
5
6
7
def inference(input_tensor, avg_class, weights1, biases1, weights2, biases2):
if avg_class is None:
layer1 = tf.nn.relu(tf.matmul(input_tensor, weights1) + biases1)
return tf.matmul(layer1, weights2) + biases2
else:
layer1 = tf.nn.relu(tf.matmul(input_tensor, avg_class.average(weights1)) + avg_class.average(biases1))
return tf.matmul(layer1, avg_class.average(weights2)) + avg_class.average(biases2)

定义输入层,生成隐藏层和输出层参数

1
2
3
4
5
6
7
8
x = tf.placeholder(tf.float32, [None, INPUT_NODE])
y_ = tf.placeholder(tf.float32, [None, OUTPUT_NODE])

weights1 = tf.Variable(tf.truncated_normal([INPUT_NODE, LAYER1_NODE], stddev=0.1))
biases1 = tf.Variable(tf.constant(0.1, shape=[LAYER1_NODE]))

weights2 = tf.Variable(tf.truncated_normal([LAYER1_NODE, OUTPUT_NODE], stddev=0.1))
biases2 = tf.Variable(tf.constant(0.1, shape=[OUTPUT_NODE]))

计算当前参数下神经网络向前传播的效果。

1
y = inference(x, None, weights1, biases1, weights2, biases2)

这里通过滑动平均衰减率和训练次数初始化这个类,用来加快训练早期变量的更新速度;global_step 为动态存储训练次数。

1
2
global_step = tf.Variable(0, trainable=False)
variable_averages = tf.train.ExponentialMovingAverage(MOVING_AVERAGE_DECAY, global_step)

variables_averages_op 这里将所有的神经网络的上参数使用滑动平均,对于指定 trainable=False 的参数不作用。计算使用了滑动平均模型处理的向前传播结果。

1
2
variables_averages_op = variable_averages.apply(tf.trainable_variables())
average_y = inference(x, variable_averages, weights1, biases1, weights2, biases2)

计算损失。交叉熵用来刻画预测值与真实值差距的损失函数,我们再通过 softmax 回归将结果变成概率分布。tf 提供了将这两个函数合并使用的函数,第一个参数是向前传播的结果,第二个参数是训练数据的答案。然后计算所有样例的交叉熵平均值。

1
2
cross_entropy = tf.nn.sparse_softmax_cross_entropy_with_logits(logits=y, labels=tf.argmax(y_, 1))
cross_entropy_mean = tf.reduce_mean(cross_entropy)

这里使用 L2 正则化损失函数,计算模型的正则化损失,计算权重的,不计算偏置。正则化损失函数用来避免过拟合。

1
2
regularizer = tf.contrib.layers.l2_regularizer(REGULARIZATION_RATE)
regularization = regularizer(weights1) + regularizer(weights2)

最后得出的总损失等于交叉熵损失和正则化损失之和。

1
loss = cross_entropy_mean + regularization

设置指数衰减的学习率。

1
2
learnging_rate = tf.train.exponential_decay(
LEARNING_RATE_BASE, global_step, mnist.train.num_examples / BATCH_SIZE, LEARNING_RATE_DECAY)

使用优化算法优化总损失。

1
train_step = tf.train.GradientDescentOptimizer(learnging_rate).minimize(loss, global_step=global_step)

每过一次数据需要更新一下参数。

1
2
with tf.control_dependencies([train_step, variables_averages_op]):
train_op = tf.no_op()

检验使用了滑动平均模型的向前传播结果是否正确。

1
correct_prediction = tf.equal(tf.argmax(average_y, 1), tf.argmax(y_, 1))

计算平均准确率。

1
accuracy = tf.reduce_mean(tf.cast(correct_prediction, tf.float32))

最后开始我们的训练,并验证数据的准确率。

1
2
3
4
5
6
7
8
9
10
11
12
13
14
15
16
17
18
19
20
21
22
23
with tf.Session() as sess:
# 初始化全部变量
tf.global_variables_initializer().run()
# 准备验证数据
validate_feed = {x: mnist.validation.images,
y_: mnist.validation.labels}
# 准备测试数据
test_feed = {x: mnist.test.images, y_: mnist.test.labels}

# 迭代
for i in range(TRAINING_STEPS):
if i % 1000 == 0:
# 使用全部的验证数据去做了验证
validate_acc = sess.run(accuracy, feed_dict=validate_feed)
print "训练轮数:", i, ",准确率:", validate_acc * 100, "%"
# 取出一部分训练数据
xs, ys = mnist.train.next_batch(BATCH_SIZE)
# 训练
sess.run(train_op, feed_dict={x: xs, y_: ys})

# 计算最终的准确率。
test_acc = sess.run(accuracy, feed_dict=test_feed)
print "训练轮数:", TRAINING_STEPS, ",准确率:", test_acc * 100, "%"

开始训练的过程,首先初始化所有变量。

1
tf.global_variables_initializer().run()

MNIST 数据分为训练数据、验证数据和测试数据。我们先准备好验证数据和测试数据,因为数据量不大,可以直接将全部数据用于训练。然后开始我们的迭代训练,训练数据有很多,我们每次训练只取一部分数据进行训练,这样减小计算量,加速神经网络的训练,又不会对结果产生太大影响。

tf 的训练通过 sess.run 函数,第一个参数是最终要计算的,也就是公式的输出,第二个参数 feed 是 placeholder 的输入。

1
sess.run(train_op, feed_dict={x: xs, y_: ys})

通过一次次的训练,总损失会越来越小,模型的预测越来越准确,到达一个临界点。

完整代码如下:

1
2
3
4
5
6
7
8
9
10
11
12
13
14
15
16
17
18
19
20
21
22
23
24
25
26
27
28
29
30
31
32
33
34
35
36
37
38
39
40
41
42
43
44
45
46
47
48
49
50
51
52
53
54
55
56
57
58
59
60
61
62
63
64
65
66
67
68
69
70
71
72
73
74
75
76
77
78
79
80
81
82
83
84
85
86
87
88
89
90
91
92
93
94
95
96
97
98
99
100
101
102
103
104
105
106
107
108
import tensorflow as tf
from tensorflow.examples.tutorials.mnist import input_data

mnist = input_data.read_data_sets("MNIST_data", one_hot=True)

# MNIST数据集相关常数,其中输入节点数为每一张图片 28 * 28 的像素数,输出的节点数就是分类的个数 10; LAYER1_NODE 为隐藏层节点数,
# BATCH_SIZE 为每次训练数据的个数;LEARNING_RATE_BASE 为基础学习率,LEARNING_RATE_DECAY 为学习率的衰减率,
# REGULARIZATION_RATE 为正则化损失函数的系数,TRAINING_STEPS 为训练的次数,MOVING_AVERAGE_DECAY 为滑动平均衰减率

INPUT_NODE = 784
OUTPUT_NODE = 10

LAYER1_NODE = 500
BATCH_SIZE = 100

LEARNING_RATE_BASE = 0.8
LEARNING_RATE_DECAY = 0.99
REGULARIZATION_RATE = 0.0001
TRAINING_STEPS = 30000
MOVING_AVERAGE_DECAY = 0.99

# 这个函数用来计算神经网络的向前传播结果,并且通过 RELU 函数实现了去线性化。avg_class 参数是用来支持测试时使用滑动平均模型。
def inference(input_tensor, avg_class, weights1, biases1, weights2, biases2):
if avg_class is None:
layer1 = tf.nn.relu(tf.matmul(input_tensor, weights1) + biases1)
return tf.matmul(layer1, weights2) + biases2
else:
layer1 = tf.nn.relu(tf.matmul(input_tensor, avg_class.average(weights1)) + avg_class.average(biases1))
return tf.matmul(layer1, avg_class.average(weights2)) + avg_class.average(biases2)

# 输入层
x = tf.placeholder(tf.float32, [None, INPUT_NODE])
y_ = tf.placeholder(tf.float32, [None, OUTPUT_NODE])

# 生成隐藏层参数
weights1 = tf.Variable(tf.truncated_normal([INPUT_NODE, LAYER1_NODE], stddev=0.1))
biases1 = tf.Variable(tf.constant(0.1, shape=[LAYER1_NODE]))

# 生成输出层参数
weights2 = tf.Variable(tf.truncated_normal([LAYER1_NODE, OUTPUT_NODE], stddev=0.1))
biases2 = tf.Variable(tf.constant(0.1, shape=[OUTPUT_NODE]))

# 计算当前参数下神经网络向前传播的效果。
y = inference(x, None, weights1, biases1, weights2, biases2)

# 这个变量用来存储当前训练的次数。
global_step = tf.Variable(0, trainable=False)

# 这里通过滑动平均衰减率和训练次数初始化这个类,用来加快训练早期变量的更新速度。
variable_averages = tf.train.ExponentialMovingAverage(MOVING_AVERAGE_DECAY, global_step)

# 这里将所有的神经网络的上参数使用滑动平均,对于指定 trainable=False 的参数不作用。
variables_averages_op = variable_averages.apply(tf.trainable_variables())

# 计算使用了滑动平均模型处理的向前传播结果。
average_y = inference(x, variable_averages, weights1, biases1, weights2, biases2)

# 计算交叉熵,用来刻画预测值与真实值差距的损失函数,第一个参数是向前传播的结果,第二个是训练数据的答案。
cross_entropy = tf.nn.sparse_softmax_cross_entropy_with_logits(logits=y, labels=tf.argmax(y_, 1))

# 计算所有样例的交叉熵平均值。
cross_entropy_mean = tf.reduce_mean(cross_entropy)

# 计算 L2 正则化损失函数
regularizer = tf.contrib.layers.l2_regularizer(REGULARIZATION_RATE)
# 计算模型的正则化损失,计算权重的,不计算偏置。
regularization = regularizer(weights1) + regularizer(weights2)
# 总损失等于交叉熵损失和正则化损失之和。
loss = cross_entropy_mean + regularization
# 设置指数衰减的学习率。
learnging_rate = tf.train.exponential_decay(
LEARNING_RATE_BASE, global_step, mnist.train.num_examples / BATCH_SIZE, LEARNING_RATE_DECAY)
# 使用优化算法优化总损失。
train_step = tf.train.GradientDescentOptimizer(learnging_rate).minimize(loss, global_step=global_step)

# 每过一次数据需要更新一下参数。
with tf.control_dependencies([train_step, variables_averages_op]):
train_op = tf.no_op()

# 检验使用了滑动平均模型的向前传播结果是否正确。
correct_prediction = tf.equal(tf.argmax(average_y, 1), tf.argmax(y_, 1))
# 计算平均准确率。
accuracy = tf.reduce_mean(tf.cast(correct_prediction, tf.float32))

if __name__ == "__main__":
with tf.Session() as sess:
# 初始化全部变量
tf.global_variables_initializer().run()
# 准备验证数据
validate_feed = {x: mnist.validation.images,
y_: mnist.validation.labels}
# 准备测试数据
test_feed = {x: mnist.test.images, y_: mnist.test.labels}

# 迭代
for i in range(TRAINING_STEPS):
if i % 1000 == 0:
# 使用全部的验证数据去做了验证
validate_acc = sess.run(accuracy, feed_dict=validate_feed)
print "训练轮数:", i, ",准确率:", validate_acc * 100, "%"
# 取出一部分训练数据
xs, ys = mnist.train.next_batch(BATCH_SIZE)
# 训练
sess.run(train_op, feed_dict={x: xs, y_: ys})

# 计算最终的准确率。
test_acc = sess.run(accuracy, feed_dict=test_feed)
print "训练轮数:", TRAINING_STEPS, ",准确率:", test_acc * 100, "%"
Extracting MNIST_data/train-images-idx3-ubyte.gz
Extracting MNIST_data/train-labels-idx1-ubyte.gz
Extracting MNIST_data/t10k-images-idx3-ubyte.gz
Extracting MNIST_data/t10k-labels-idx1-ubyte.gz
训练轮数: 0 ,准确率: 9.20000001788 %
训练轮数: 1000 ,准确率: 97.619998455 %
训练轮数: 2000 ,准确率: 98.0799973011 %
训练轮数: 3000 ,准确率: 98.2599973679 %
训练轮数: 4000 ,准确率: 98.1999993324 %
训练轮数: 5000 ,准确率: 98.1800019741 %
训练轮数: 6000 ,准确率: 98.2400000095 %
训练轮数: 7000 ,准确率: 98.2200026512 %
训练轮数: 8000 ,准确率: 98.1999993324 %
训练轮数: 9000 ,准确率: 98.2599973679 %
训练轮数: 10000 ,准确率: 98.2400000095 %
训练轮数: 11000 ,准确率: 98.2400000095 %
训练轮数: 12000 ,准确率: 98.1599986553 %
训练轮数: 13000 ,准确率: 98.2599973679 %
训练轮数: 14000 ,准确率: 98.299998045 %
训练轮数: 15000 ,准确率: 98.4200000763 %
训练轮数: 16000 ,准确率: 98.2800006866 %
训练轮数: 17000 ,准确率: 98.3799993992 %
训练轮数: 18000 ,准确率: 98.3600020409 %
训练轮数: 19000 ,准确率: 98.3200013638 %
训练轮数: 20000 ,准确率: 98.3399987221 %
训练轮数: 21000 ,准确率: 98.3799993992 %
训练轮数: 22000 ,准确率: 98.400002718 %
训练轮数: 23000 ,准确率: 98.400002718 %
训练轮数: 24000 ,准确率: 98.4200000763 %
训练轮数: 25000 ,准确率: 98.3200013638 %
训练轮数: 26000 ,准确率: 98.4200000763 %
训练轮数: 27000 ,准确率: 98.3799993992 %
训练轮数: 28000 ,准确率: 98.400002718 %
训练轮数: 29000 ,准确率: 98.3200013638 %
训练轮数: 30000 ,准确率: 98.3900010586 %

下一节总结 准确率、交叉熵平均值、总损失、学习率、平均绝对梯度 的变化趋势。